Cafe Racer Forum banner

A makeover for Minnie Monster

18K views 69 replies 11 participants last post by  Rezeer  
#1 · (Edited)
at risk of setting myself up for later ridicule............

i decided at last years festival of italian motorcycles here in melbourne that i wanted to attend this year's with something a bit different. not exactly special, i'm too limited in funds and time and a tightarse for that. just custom of some sort. i did plan to have done something with the 400ss, but it's still completely disassembled so i figured i'd turn attention to minnie. last year i got a paolo tex fairing - Paolo Tesio Texdesign - for it via an italian guy on the 851 forum as he won't sell outside italy and bellisimoto mark them up a lot. wasn't sure i'd ever use it, but last week i figured i'd left it late enough to start trying to acheive something. this year's is nov 13, 2 weeks tomorrow. nothing like a badly planned rush job.

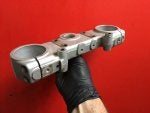
the fairing is meant for a water cooled st based frame monster, whereas minnie was a 97 600. it comes with a wonderfully cut steel mounting bracket system that's a bit heavy and extremely confusing. i gave it a prime and spray and stuck it on and then tried to work out what the hell to do next. i've never fitted a fairing like this before - i'm not so good at freestyle. took a while to work out where to position stuff, then i figured that the one critical point was distance between front guard and fairing at full compression, so i chose that as a starting point. positioned it, drilled a couple of holes, realised that the bracket was a bit too high visually so dropped it to the bottom and went through the procedure again. then i figured i'd try to fit the headlight (finding a 5" headlight was a real drama) and found it was hitting the mounting bracket and couldn't get it to aim low enough, etc. so i started again. finished up with only 2 holes to fill.

i printed out real size pics of the dash options, the acewell 6554 looks best by far, but is out of stock until a few days before go time. no reason not to use it then.

rear sets ordered, some sort of exhaust to make and fit, bodywork to paint. i do have some paso wheels i was thinking of using too, just for weird, but the brake caliper mouting is an issue i don't have time for.

 
#3 ·
I think you can manage your photos in the "go advanced" bit of the messaging and editing.

I really like the Idea of printing out the dash options to get a feel of how it might look before going through with buying it. I've used the printer for all sorts of template making activities but never thought to do something as simple and effective as that.
 
#6 · (Edited)
the rear mounts for the fairing were two piece saddles that go around the frame on the top tube back from the steering head, but the rear screw position was hitting the seam on the fuel tank, so they weren't usable. there's really not any points to attach anything to in the area nicely, and the area of frame the fairing covers is mostly a three tube join, so not possible to hide a saddle there.

i decided to run some mounts from the bottom of the ignition switch mounts (tube nut with screws from top and bottom). given it was sunday and no bolt shops were open i bought some threaded rod at bunnings and cut some bits around 110mm long, cut some aluminium tube spacers and found some steel strap. what to do at the end had me flumoxed due to the angles involved, but then thought of using a well nut in some sort of holder. didn't have any 15mm square tube on hand, so some 15mm round got the gig. i was quite happy with how it turned out in the end given the constraints. if it was a race bike then a hole in the fairing and a zip tie would've taken a few hours out of the job.


the headlight is a 5" bottom mount thing, about all i could find in the right size locally in the time frame required (ie, last thursday night for delivery on friday), not that there are many more out there it seems. i had various ideas, like hanging it from the top and using a gearshift type double threaded tube for a bottom adjuster, but the pivot on top was too far back and would've made it rotate each end too much, causing it to hit the fairing and bracket. i was then planning to make up some lower arms to support it from the bottom mount brackets (which conveniently screwed onto the light, meaning they screwed off just nice). got interrupted at that point and had to go home, which was good as i had a chance to think about it some more. i made the headlight into a side mount style by drilling a couple of 10.5mm holes for the rivnets, then using 10mm bolts and some washers for support to put some flats on the sides. went remarkably well. one bolt in the vice, tube on the other, bend gently. didn't even distort the opening. rivnuts even went in well. machined a couple of spacers and with the side mount arms from the fairing kit, on it went. which ended with fairing mounted, meaning i could then pull it off and today it'll go for paint. woohoo.


without fairing shows the headlight support better.


and that was it for the night.
 
#7 ·
i made a rego plate mount plate to replace the original plastic guff. i didn't want to cut the back of the frame like as is the fashion (not much of a cutter). made a cardboard template, transferred it to some aluminium sheet, cut, shaped and drilled and two hours later, done. except for a beadblasted, scotchbrite and paint anyway.

i checked the other bikes in the factory and they all had the rego plates at around 30 degrees inclination, which surprised me - i thought they'd be more upright than that. but after i'd done the second bend (pain in the arse without a bender) i realised that at ride height the section of frame it mounts to is about 10 degrees down, so i had to go an extra 10 degrees to give me 30 on the plate. the trophy maker in the factory next door has a bender, so i hit him up for an exrta 10 degrees. far easier than setting up the two bits of steel in the vice.

rather happy with the effort, filled in two hours i didn't really have nicely.

 
#8 · (Edited)
i have this thing for long mufflers. previously i had bought some of the danmoto ss-1 harley mufflers as i like the look. fitted them to a customer's monster here - Brad The Bike Boy: Danmoto SS-00001 Harley Davidson mufflers fitted to the Monster

they make 3 versions of these, one (the ss-2) is a smaller od than the ss-1 and one (ss-3) is longer than the ss-1, which are 500mm long. they told me the ss-3 were 780mm long, and i thought "that sounds cool" so i ordered some. turns out 780mm is a bit more than i was expecting. they're really long. the ss-3 have mounts very close to the outlet end, but at least they're even. i found an old ducati performance high mount muffler bracket in a box of stuff that bolts up under the rear tray area in front of the rego plate, so gave it a bit more of a bend and bolted it on using the most forward of the two welded on mount brackets. certainly made the muffler bracket bit a shit load easier. i had some muffler pipes made up when i was playing with the ss-1, so i might cut one of them up a bit to give me the orientation. i'd like to pick up the angle of the bottom of the little black side panel for the muffler, but the entry needs to be fairly high to do that and might be beyond a cut and weld without ending up with a stupid looking sharp join. if i had the patience and time i could taper segment it, but that'd drive me spare. the inevitable mig weld finish would probably embarrass me too much as well.

i did a mock up and then used paint to take some off the end. cut to be about level with the top of the rear tray, i think it'll suitably wacky and probably likely to offend some.

i do also have a pair of danmoto jisu to suit the monster, which are a hexagonal shape, but they're fairly low and rearward set and big. more modern in shape, but not as easy to package. might be an option if the rest turns pear shaped and i need to stop it all going tits up.

i'm also planning to cut up a std header so it comes out the rh side only as i found one of them in the junk pile too. hopefully a cheap 2-1 header. it's only a 400, so i don't think both cylinders breathing through one 40mm od pipe will be an issue. i'll use some mild steel bends and mig it up, then drop it at the platers down the road for ceramic coating in black. by next monday.

 
#9 · (Edited)
muffler shortened. i'm kind of getting into this "just cut it up" vibe. it's quite liberating. when it goes well, anyway. i had to resort to the hacksaw, didn't know how else to do it in the end with the tools to hand.

i think i'll replicate the dp muffler hanger with some mods to move the mount forward and up a bit. moving it as close as i can to the seat lock without hitting the seat lock. i do have the other little mount that bolts to the seat lock screws, but this seat lock has the little lever you push to make it work. i guess I could just get a later style seat lock. or pull the lock and leave the cable end hanging where i can just pull it. that's sounding like a good idea, now that I think about it.

i'll hit up ebay for a seat lock just in case. maybe i can just remove the lever. something else to waste time thinking about. glad i posted this, that thought hadn't came to me before. it's amazing the solutions you find when you step back and let the mind wander.

the cardboard is my stand in rearset, just so i know where it's going to be. the rather more metallic ones are still in transit.


for today's addition to the "i wish i'd started this whole project earlier" list, i was searching for tachos and everything is small because apparently that's what we all want. i like the idea of a big round one, like a guzzi lm4 or 5 had. speedhut make a 4 1/2" tacho that'd fill up the fairing bump real nice. maybe a koso db01r+ below it for speed and idiots.

4-1/2" Tachometer 12K RPM (Dash Mount). Auto Without Shift-light From Speedhut.

KOSO-DB-01R+

mmmmmm.

it's still looking like an acewell 6554, due to arrive next tuesday or so.
 
#11 · (Edited)
i found another exhaust header in the factory to use for the mods, as the one fitted to the bike has a couple of lambda probe bosses welded in and looks a bit crap. copied what was done in this forum post - My 2 into 1 Exhaust project - Ducati.ms - The Ultimate Ducati Forum

i cut up the std main header (horizontal cylinder and cross over is one piece), cutting out one outlet side and part of the stamped x-over piece, and welded in some sections cut from 90 degrees bend exhaust tube. welding mild steel into stainless because that's what i had. found out later in the day when the gas ran out and i rang the guy i buy welding stuff from that the gas was possibly a bigger issue - the 90% argon, 10% co2 would be putting carbon into the haz and could lead to cracking. bummer. anyway, welded it all up and finished the welds, etc, and had it all ready to go in around 2 hours. i was amazed at how well it was going.

not for long as it turned out. i fitted it to see how it went and found the pipe hanging down below the engine with a gap of nearly 40mm at the back of the cases. refitted the original header (same part number stamped onto both) and it was 25mm at most. it looked not too silly, modified one looked crap. so i cut a slot thru most of the front bend of two hacksaw blade widths and closed it on the top side and tacked. fitted - much better. then i had to do the inverse to lower the collector under the back of the engine, but it was still a heap higher where the vertical header was meant to go in - 25mm higher off the bench. so i pulled out the vertical header and cut a 25mm section out of the straight piece, then refitted it to align it and the scribe marks i'd made before i cut it even lined up. welded it back together and it refitted again - straight in. couldn't believe it. so, more welding and finishing (when i say finishing I mean enough to make it look somewhat smooth and hope that the ceramic coating covers a multitude of sins.

then i made a muffler mount bracket to go under the tail in place of the dp one that i found, but decided not to use. bolted the shortened muffler to it and dug out a couple of muffler inlet pipes i had made when i was trying to fit the ss-1 mufflers. cutting and shutting gave me 3 pieces of what i needed and welded them up. final fit was good. even seems to clear the swingarm when compressed.

then i added some indicator mounts to the rego plate bracket and the front fairing side supports. cut the original dash mounts off the upper triple and took off some of the bosses and casting seam and smoothed the front edge out as much as my skill and patience allowed. i used some paint stripper to remove the paint that the beadblaster was having trouble moving. i've never done that before, man it worked well. i made a little flat piece to go across the front of the triple and cover the raised flat sections in front of the fork tubes that will hold all the cables and hoses in place. then beadblasted everything so it could go off this morning to the powdercoaters.

other than that, now just waiting for stuff. rearsets, dash, powdercoating, ceramic coating, paintwork, brake pressure switch, seat. 5 days to go.


Attachments

#15 ·
it has a white stripe along the top of the tank, so no more stripes needed. i've had this tank for a long time, and wanted to use it but it's a bit of a noose now.

with the black bit, i was just wondering if taking the side visual impact off helped. i thought it would before i test fitted it all, now not so sure. fairing is meant for a water cooled monster, and ends at the radiator.
 
#18 · (Edited)
so i'm a few days behind. got everything back. most of the ordered parts arrived. the ducabike rearsets box had been opened and someone had taken the toe pieces out of it, which i found too late to have them sent. i had to machine a couple yesterday, just round without offset, which ended up being two pieces pressed together as i didn't have enough material large enough to machine down to the 15mm of the foot lever holes. having fitted them i find the footrest to gear lever distance a little short, even with the footrests as far back on their eccentrics as possible. also found the rear brake seems to have a most unusual amount of feel and power.

i ordered screws from two places on friday - one lot were wrong, the other didn't get picked up by the courier until late afternoon. meaning i had to use whatever i could find - longer button head was the issue, plus fairing screws. i realised i had some ss screen screws, which i had sent out in the big lots of replating i had done. so at least i had four nice gold screws to hold the front fairing on.

fitting the handlebars took way longer than expected. i had to drop the forks down to level with the top triple, but even then the controls couldn't be rotated down very far before they hit the top triple. i was going through my box of monster leftovers i got with an engine i bought and found some taller bar supports. 42mm instead of the original 21mm. don't recall which year/model had them now. a quick paint and on they went - bars now high enough to rotate the controls down nicely and nothing hitting the sides of the tank, another typical issue with monsters when you fit clip ons or lower bars. taking the sharp bends out of the throttle cables made a big difference to the returnability too, always a bonus.

cheap bar end mirrors didn't fit the smaller id aluminium handlebars so i used a piece of hose and a cut down m8 flange nut. worked a treat. nice and tight and usable, altho they end up being a bit too high overall. i'll have to try running them under the bars, not sure if i will be able to see them or not.

the front brake hose was too long with the lower bars. it was already too long, from memory it's some sort of guzzi fitment i found at the old place. so i looped it down at the caliper. looks kinda silly, but i have no time to think of anything else.

managed to jam all the wiring that usually sits behind the headlight up in front of the airbox under the tank. rather neat jam job i must say. my little piece of flat across the front of the upper triple likewise controlled everything nicely.

i covered the carb oil heater lines with some fabric style heatshrink, which made them look a lot more background instead of obvious.

i gave the painter some agro with the white stripes - he was hoping to do it earlier in the week. ended up finishing it late saturday, not cleared over due to me not giving him enough time. but done for now and everything on. as i left it late last night it was assembled, running (well, battery was out on charge, but it had fired) and just need a clean.

the space where the dash usually is was left empty. didn't get to it, no easy option that was cheap enough to undo later except one - zip tie the iphone in, with plastic bag protection if raining.

 
#19 · (Edited)
the forecast for today (sunday) had started out as being low 20's and maybe a chance of rain. it progressed during the week to 17 with expected rainfall going from 0 - 2mm to 0 - 5mm to 3 - 8mm and finally 8 - 25mm (a full inch). woke to it raining this morning and figured it was going to be a extremely wet arse, but it cleared around 8, held off until 11 ish when we all got a brief shower, then clear until after i got home. lovely.

for a speedo i used the iphone with a free speedo app. worked great in the overcast morning, not so good in the afternoon when i just couldn't see it. well, except when going under overpasses. i figure i've been riding long enough to know if it's in neutral or the indicators are on. and it had enough fuel. looking forward to a dash though, will go the acewell 6554 when it arrives back in stock locally.

riding position felt a little tight at first, but the next time i thought about it was when nearly home, when it occurred to me that i haven't thought about it at all. hadn't needed to adjust anything (took tools jic). like the first sport classic i rode back in 06, when they had the low clip ons, the uncomfortable feel vanished seconds into the ride.

overall, i love it.

 
#23 ·
played a bit more today. i'm getting an acewell 6554 for christmas - i had no ideas to offer, so i thought of this. will get boxed for the day, but i have early access to allow fitting. i modified a bracket I found in the bits box and welded to the spacer tube mounted between the subframe plates and front fairing mount. i had to offset it so the round tacho part of the 6554 is in the middle of the fairing bulge. will paint and fit and then get into the really fun part - wiring.


i thought i'd try fitting one of the danmoto baffles to see if it would shut it up a bit. i removed the end cap and machined it out a bit to allow the baffle to slide in and stop about 50mm down. then i machined a groove to fit a circlip too. once i'd done that, i realised i didn't have any 50mm clips, so bent a round one up out of coat hanger wire. not exactly springy, but surprisingly effective for now anyway. the baffle has a central tube with 12 holes drilled in it, all 13mm diameter. combined, that's about equivalent to a 45mm tube, which is the inlet size of the muffler. net effect - sfa. it's a bit different sound, but i made a video i won't bother posting as it's nearly as loud with as it is without. i tried blocking 4 of the 12 holes - no change. still very loud.

 
#24 · (Edited)
acewell mount painted and dash on. not wired yet, of course. that's the painful bit. it comes with some nice, but large connectors that i might just cut off. the original ducati dash uses a 11 pin screwloc connector which i was going to use to loom side of, as i like plug and play and dislike cutting original bits. the acewell has connectors for lap timer sensor and controller that i just won't use, so i'll cut them and cover. i did have it all up under the front of the tank on the airbox lid, but maybe moving the screwloc down to behind the steering head or even into the headlight mount bracket will be easier. there's certainly easier acewells (less functions) to wire up.


i have tried a couple of things to shut it up a bit. i found a showa 41/43 preload tube is just the right size to slide over the danmoto baffle. i tried that, giving only two 10 or 12mm holes for the exhaust to flow through and it still wasn't that quiet. i did take some video with the iphone, but it sounds a bit wacky. i'll try it on road once i get the dash sorted. looking forward to riding it again. rego is due soon, not sure i want to run it again for another year. i'm hoping to have the ss going soon, but then again this is me and that's probably a good candidate for straight onto club plates around 03/18.
 
#25 ·
acewell dash is on and working. slight fitment debacle here: http://www.caferacer.net/forum/tech...chnical/30986-acewell-dash-fitment-issue-residual-voltage-input-sort-thing.html

their temp sensor thread is 1/8 bspt, not 1/8 not. 1 tpi difference. i guess you could call it a self locking interference fit if you'd cut the thread before realising it.

the inverter is now gone, replaced with old school relay. it seemed like a good idea.

off to the island classic tomorrow, so the low fuel light needed to work.
 

Attachments